Linux内核实验笔记
次访问
原文地址OS2 内核编程和驱动程序开发实验
基于布加勒斯特理工大学自动控制与计算机学院计算机科学与工程系的 “操作系统2” 课程
环境配置
软件配置
- 主机:在win10上使用oracle virtualbox创建的 ubuntu 20.04 作为上位机,用于编辑模块源代码、编译模块、将模块应用到操作系统上等
- 虚拟机:通过Docker配置虚拟机模拟OS内核,在ubuntu 20.04上直接使用,通过脚本运行完成内核模块代码测试
操作流程
若提示用户没有sudo权限,使用
su -切换到 root 用户即可,密码是虚拟机设置镜像时自己设置的,一般就是开机密码
在ubuntu 20.04中安装Docker
1
2
3
4
5
6
7
8
9
10
11
12
13
14
15
16
17
18
19
20
21
22
23
24
25
26
27
28
# 1. 安装依赖
sudo apt update
sudo apt install -y \
ca-certificates \
curl \
gnupg \
lsb-release
# 2. 添加 Docker 官方 GPG 密钥
sudo mkdir -p /etc/apt/keyrings
curl -fsSL https://download.docker.com/linux/ubuntu/gpg | \
sudo gpg --dearmor -o /etc/apt/keyrings/docker.gpg
# 3. 添加 Docker 软件源
echo \
"deb [arch=$(dpkg --print-architecture) \
signed-by=/etc/apt/keyrings/docker.gpg] \
https://download.docker.com/linux/ubuntu \
$(lsb_release -cs) stable" | \
sudo tee /etc/apt/sources.list.d/docker.list > /dev/null
# 4. 更新 apt 并安装 Docker
sudo apt update
sudo apt install -y docker-ce docker-ce-cli containerd.io
# 5. 启动并设置开机启动
sudo systemctl start docker
sudo systemctl enable docker在ubuntu 20.04中安装必需软件
1
2
3
sudo apt update
sudo apt install -y flex bison build-essential gcc-multilib libncurses5-dev \
qemu-system-x86 qemu-system-arm python3 minicom创建一个脚本文件并编辑如下内容,随后运行脚本
1 |
|
1 | # 在终端运行脚本 |
显示如下内容时说明配置成功
此时根目录下会出现一个目录/linux,这是docker虚拟挂载出来的,只有执行脚本时才会出现这个目录。/linux/tools/lab是这个docker容器的工作目录,是我们编译模块和启动虚拟机的地方。
需要两个Docker内部的终端,通过tmux(终端复用器)可以得到分离的两个终端,输入指令如下
1
$tmux
使用ctrl+b然后shift+”可以得到水平分割的两个终端,如下所示
使用ctrl+b然后shift+ > 使用ctrl+b然后按下 [ 可以自由浏览终端界面,方便复制粘贴代码
使用ctrl+b然后按下 d 可以推出tmux,但这会杀死所有tmux正在执行的进程配置好环境以后就可以进行试验了,将上面的窗格作为虚拟机OS2,下面的窗格作为主机Docker容器,在上面的窗格中执行以下命令即可生成骨架,开始实验
1
$ LABS=<实验名称> make skels
接下来要启动虚拟机,执行
make console使用root用户名登陆我们的工作流程包括:在Docker内编写模块代码,修改Make|Kbuild文件,执行make build编译得到ko模块,然后在虚拟机中通过
insmod命令将其插入到虚拟机,或者通过rmmod将其移除。每次构建模块无需重启虚拟机,停止虚拟机的操作是 ctrl+a,然后按下 q
一 内核模块
实验目标
- 创建简单的模块
- 描述内核模块编译的过程
- 展示如何在内核中使用模块
- 简单的内核调试方法
1 内核模块的使用|加载|卸载
使用 make console 启动虚拟机,并完成以下任务 (正确启动虚拟机以及上位机应该是下面这个界面)
- 使用
ctrl+alt+t打开一个终端,确保pwd下有文件local.sh,使用以下代码进入docker容器
1 | sudo bash ./local.sh docker interactive --privileged |

- 在docker容器中构建骨架,编写模块代码,编译模块,然后启动虚拟机安装测试模块
1 | # 在docker容器中构建骨架,在里面编写代码 |

- 加载内核模块
- 在
~/skels/kernel_modules目录下有很多模块目录,里面存放要完成的任务
- 在

2. 在 1-2-test-mod 这个目录下,执行命令 insmod hello_mod.ko 完成模块加载

列出内核模块并检查当前模块是否存在
使用指令
lsmod查看模块是否加载成功
卸载内核模块
- 使用指令
rmmod hello_mod(不需要后缀) 完成模块卸载
- 使用指令
使用 dmesg 命令查看加载/卸载内核模块时显示的消息

2 Printk
配置系统,使消息不直接显示在串行控制台上,只能使用
dmesg命令来查看
使用命令
echo "4 4 1 7" > /proc/sys/kernel/printk修改打印日志行为设置
此时再加载模块就不会显示消息在串行控制台上了

3 错误
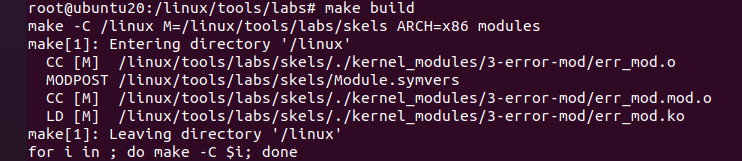
生成名为 3-error-mod 的任务的框架。编译源代码并得到相应的内核模块。
为什么会出现编译错误? 提示: 这个模块与前一个模块有什么不同?
修改该模块以解决这些错误的原因,然后编译和测试该模块。
根据TODO提示,缺少头文件
<linux/module.h>,添加后能编译成功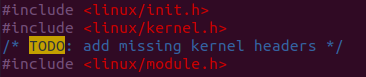
4 子模块
查看
4-multi-mod/目录中的 C 源代码文件mod1.c和mod2.c。模块 2 仅包含模块 1 使用的函数的定义。修改
Kbuild文件,从这两个 C 源文件创建multi_mod.ko模块。编译、复制、启动虚拟机、加载和卸载内核模块。确保消息在控制台上正确显示。
使用
LABS="kernel_modules/4-multi-mod" make skels构建骨架在目录
root@ubuntu20:/linux/tools/labs/skels/kernel_modules/4-multi-mod中修改Kbuild文件1
2
3# TODO: add rules to create a multi object module
obj-m = multi-mod.o
multi-mod-y = mod1.o mod2.o然后
cd /linux/tools/labs进行编译make build启动虚拟机,加载和卸载
multi-mod.ko模块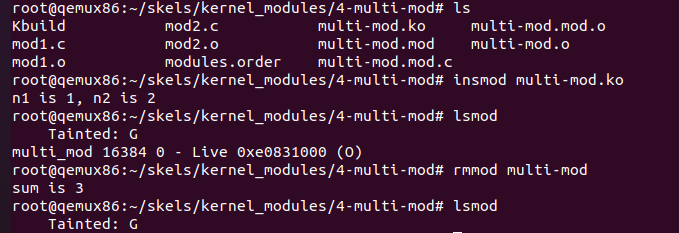
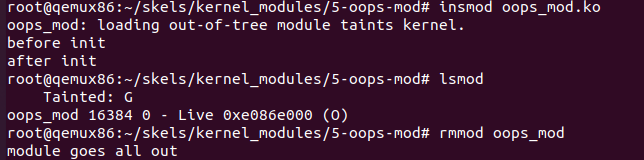
5 内核 oops
学习当内核模块代码有问题导致模块插入后内核发生了错误应该怎么处理
使用
LABS="kernel_modules/5-oops-mod" make skels构建骨架在
root@ubuntu20:/linux/tools/labs/skels/kernel_modules/5-oops-mod中修改Kbuild文件,为Kbuild文件添加编译标记,使得之后在安装模块时,会出现编译过程信息,提示哪里出现了问题1
2
3
4# TODO: add flags to generate debug information
ccflags-y += -g
obj-m = oops_mod.omake build进行编译,然后在虚拟机中安装模块insmod oops_mod.ko会输出很长一段编译信息,其中最重要的是1
2
3
4
5
6# 告诉我们错误的原因
BUG: kernel NULL pointer dereference, address: 00000000
# 告诉我们这是第一个 oops(#1)
Oops: 0002 [#1] SMP
# 造成错误的指令的地址,它解码了指令指针 (EIP) 的值,并指出错误出现在 my_oops_init 函数中,偏移为 d个字节
EIP: my_oops_init+0xd/0x22 [oops_mod]1
2
3
4
5oops 代码(0002)提供了有关错误类型的信息(参见 arch/x86/include/asm/trap_pf.h ):
第 0 位 == 0 表示找不到页面,1 表示保护故障
第 1 位 == 0 表示读取,1 表示写入
第 2 位 == 0 表示内核模式,1 表示用户模式有了 EIP 值就可以使用 address2line 来找到出错的代码出现的位置,在主机中使用
1
2addr2line -e oops_mod.ko +0xd
/linux/tools/labs/skels/./kernel_modules/5-oops-mod/oops_mod.c:15可以知道是 oops_mod.c 的第 15 行出现了问题
由于oops_mod.ko模块加载卡住了,所以无法正常卸载,因此要重启虚拟机才能完成卸载
模块加载必须经过init函数以及注册exit函数
重启虚拟机之后,删去第15行代码,重新编译以及插入模块即可完成模块的加载与卸载
6 模块参数
在不修改源代码
cmd_mod.c的情况下,加载内核模块以显示消息Early bird gets tired
通过命令行传递参数可以修改函数变量的值从而输出特定内容

使用命令行传递参数需要源代码满足以下条件
变量必须是模块级别的全局变量,不能是函数内部变量,必须像这样:
1
static char *str = "default";
使用
module_param()宏声明该变量为模块参数1
2
3
4
5
6/*
str:变量名
charp:变量类型(支持 int、charp、bool、ulong 等)
0:权限标志位(sysfs 中的访问权限)
*/
module_param(str, charp, 0);模块必须使用标准
init/exit入口函数机制,如1
2
3
4
5static int __init my_init(void) { ... }
static void __exit my_exit(void) { ... }
module_init(my_init);
module_exit(my_exit);
# 这样,内核在执行 insmod 时会先处理模块参数,再调用 init 函数。模块参数变量声明前不能加
const因为内核需要在运行时修改它1
static const char *str = "hello"; // ❌ 无法作为 module_param
7 进程信息
检查名为 7-list-proc 的任务的框架。添加代码来显示当前进程的进程 ID(
PID)和可执行文件名
执行
root@ubuntu20:/linux/tools/labs/skels/kernel_modules/7-list-proc# vim list_proc.c命令,修改list_proc.c文件源代码在注释TO DO处添加如下代码
1
2
3
4
5
6
7
8
9
10
11
12/* TODO: add missing headers */
/* TODO/2: print current process pid and its name */
pr_info("Current process: pid = %d; comm = %s\n",
current->pid, current->comm);
/* TODO/3: print the pid and name of all processes */
pr_info("\nProcess list:\n\n");
for_each_process(p)
pr_info("pid = %d; comm = %s\n", p->pid, p->comm);
/* TODO/2: print current process pid and name */
pr_info("Current process: pid = %d; comm = %s\n",
current->pid, current->comm);编译执行得到如下输出

这里得查很多资料才能知道这些代码是什么意思
8 KDB
使用KDB(Kernel Debugger)分析堆栈找出错误代码位置|使用KDB找到模块加载的地址|在一个新窗口中使用 GDB 并根据 KDB 提供的信息查看代码(没解决)
在虚拟机中配置KDB使用hvc0串口
echo hvc0 > /sys/module/kgdboc/parameters/kgdboc使用 SysRq 命令启用 KDB (Ctrl + O g),此时进入KDB调试命令行,输入Help可查看可用KDB命令,如果出现乱码例如文字显示不出来,很多乱码挤在界面右侧,是因为minicom的换行格式有问题,按下 ctrl + A 然后按下 U(或者L),这样会将minicom从列显示模式切换到行显示模式,此时输出即可恢复正常
kdb> “这里输入go可以继续执行内核跳出kdb调试,按回车是重新输入并执行上一个命令,按↑是显示上一个命令”
加载
hello_kdb模块。该模块在写入/proc/hello_kdb_bug文件时会模拟一个错误。使用以下命令模拟错误:echo 1 > /proc/hello_kdb_bug运行这个命令就会发生oops错误,然后会进入KDB调试命令行,使用
[0]kdb> bt即可分析堆栈跟踪并确定导致错误的代码,bt输出的最下面是执行的起始处(堆栈跟踪要从后往前看),有些行前面的 ? 是指KDB不确定这个地址偏移是否计算正确,bt输出中最重要的就是kgbd_panic、kgdb_breakpoint这两个点,这表明有函数执行之后发生了错误,可以看到kgbd_panic下面的函数是panic,panic下面的函数是dummy_func1并指明它是 hello_kdb.c文件中的函数,所以错误代码就是 hello_kdb.c 中的函数 dummy_func1 有问题1
2
3
4
5
6
7
8
9
10
11
12
13
14
15notify_die+0x4d/0x90
exc_int3+0x5c/0x140
handle_exception+0x140/0x140
EIP: kgdb_breakpoint+0xe/0x20
Code: b4 26 00 00 00 00 8d b6 00 00 00 00 31 c0 c3 8d b4 26 00 00 00 00 8d b6 00 00 00 00 3e ff8
EAX: 0000001e EBX: c40b9e00 ECX: 00000000 EDX: 00000000
ESI: c180e898 EDI: c1badb40 EBP: c4519e2c ESP: c4519e20
DS: 007b ES: 007b FS: 00d8 GS: 00e0 SS: 0068 EFLAGS: 00000002
? exc_general_protection+0x2c0/0x2c0
? kgdb_breakpoint+0xe/0x20
? kgdb_panic+0x4d/0x60
panic+0xbc/0x266
? dummy_func1+0x8/0x8 [hello_kdb]
dummy_func18+0xd/0xd [hello_kdb]
dummy_func17+0x8/0x8 [hello_kdb]使用
[0]kdb> lsmod可以看到模块的加载地址
二 内核 API
实验目标:
熟悉基本的Linux内核API
内核是一个独立运行的实体,不能调用用户空间的任何库,所以不能使用printf、malloc、free等常见的用户控件函数
描述内存分配机制
描述锁定机制
1 Linux 内核中的内存分配
GFP_KERNEL——使用此值可能导致当前进程被挂起。因此,它不能在中断上下文中使用。GFP_ATOMIC——使用此值确保kmalloc()函数不会挂起当前进程。它可以随时使用。
1 | static char *mem; |
重点在于使用kmalloc分配内存给指针,从而能使用指针指向内存空间进行引用、操作,其实kmalloc的用法和malloc差不多
2 在原子上下文中睡眠
1 | static int sched_spin_init(void) |
学习重点在于学会使用自旋锁变量以及使用时的注意要点
3 使用内核内存
1 | struct task_info { |
重点在于学习如何给分配了内存的变量赋值以及如何使用current宏、next_task宏找到进程PID值
4 使用内核列表
1 | struct task_info { |
知识点
list_entry(ptr, type, member)()返回列表中包含元素ptr的类型为type的结构,该结构中具有名为member的成员。list_for_each(pos, head)使用pos作为游标来迭代列表。list_for_each_safe(pos, n, head)使用pos作为游标,n作为临时游标来迭代列表。此宏用于从列表中删除项目。list_del(struct list_head *entry)()删除属于列表的entry地址处的项目。list_add(struct list_head *new, struct list_head *head)()将new指针所引用的元素添加到head指针所引用的元素之后。- 使用
static struct list_head head;来声明一个链表头,在使用head前进行INIT_LIST_HEAD(&head); INIT_LIST_HEAD(struct list_head *list)()用于在进行动态分配时,通过设置链表字段next和prev,来初始化链表的标记。
5 使用内核列表进行进程处理
1 | // kernel_api\5-list-full\list-full.c |
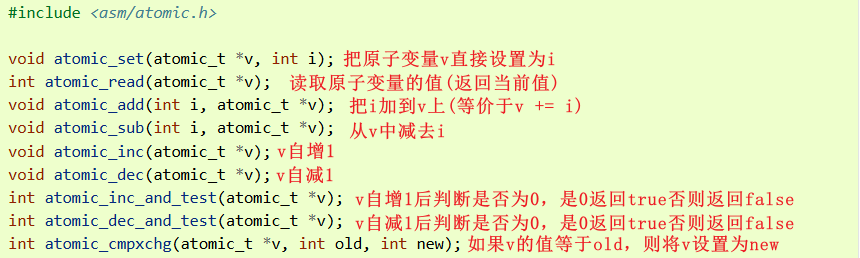
一些常用的原子操作函数
6 同步列表工作
代码相关答案可以看/templates文件夹下的代码
使用DEFINE_RWLOCK(lock)定义一个读写自旋锁
1 | /* TODO 1: you can use either a spinlock or rwlock, define it here */ |
读写自旋锁中的代码涉及到的共享资源会被锁定
1 | write_lock(&lock); |
简单来说,就是write_lock和write_unlock之间的代码片段当cpu在执行时会进入临界区,此时如果是write_lock,那就是只有当前的进程能写,其他的进程包括CPU都不能写,如果是read_lock,那就是所有进程都不能写,但是可以一起读
如果代码只涉及共享资源的访问就使用read_lock,如果设计对共享资源的修改就使用write_lock,在这个例子中,由于要修改ti的时间戳和计数器,所以使用了write_lock读自旋锁,而只需要打印ti的pid和时间戳,所以使用read_lock
关于 EXPORT_SYMBOL(name); ,其作用是导出模块代码中的函数或者变量给其它模块使用,当模块代码中使用了 EXPORT_SYMBOL(name); 那么加载此模块后,其他模块也能使用 name 代表的函数或者变量,但有几点要求
- 函数或变量不能是静态的,即不能使用 static 关键字
- 必须在函数定义或变量赋值后使用
7 在我们的列表模块中测试模块调用
这一节没什么好讲的,就是一个模块依赖关系,如果模块代码使用了其他模块导出的内核符号name,则这个模块依赖于其他模块,被依赖的模块由于模块引用计数refcnt>0无法卸载,所以必须先卸载依赖模块,在这个例子中就是必须先卸载 list-test 模块,然后卸载 list-sync 模块
除此以外,如果一个模块要使用其他模块导出的内核符号(函数或者变量),必须先extern声明这个内核符号再使用,例如
1 | // 要使用 task_info_print_list |
很多东西都是背板式的,如果每个不熟悉的符号都使用LXR或cscope去查询,会消耗大量时间而且不一定能查找正确,学习linux内核编程有如学习一个语法无比复杂的语言,与其先背下来所有单词和认识所有语法后再实践练习使用,不如先开口把最常用最实用的操作记下来,让自己变得熟练,那么以前那些晦涩难懂的知识也就比较容易理解了
三 字符设备驱动程序
实验目标
- 理解字符设备驱动程序背后的概念
- 理解可以在字符设备上执行的各种操作
- 使用等待队列进行工作
0 简介
1 | // struct file -linux - linux-2.6.0\include\linux\fs.h |
1 注册/注销
- 使用 mknod 创建 /dev/so2_cdev 字符设备节点
1 | // 在QUMU上使用mknod命令 |
此时只是创建了一个节点,要使用register_chrdev_region完成注册才能在/proc/devices中看到设备文件
- 实现设备的注册和注销
1 | /* TODO 1/6: register char device region for MY_MAJOR and NUM_MINORS starting at MY_MINOR */ |
MKDEV的意思是从主设备号MY_MAJOR开始注册次设备号MY_MINOR,注册NUM_MINORS个设备文件,如果当前主设备号下的设备文件数大于NUM_MINORS,则让主设备号+1继续注册
2 注册一个已经注册过的主设备号
1 | // 使用 cat proc/devices 看已有的设备文件的主设备号,然后替换掉下面的宏定义 |
此时会返回错误码 -16,#define EBUSY 16 /* Device or resource busy */ 表示是当前设备正忙无法被注册
3 打开和关闭
打开和关闭字符设备文件
- 初始化设备
1 | struct so2_device_data { |
为当前设备文件建立一个结构体,成员有cdev结构体,该结构体用于在系统中注册字符设备(供cdev_init和cdev_add函数使用),字符数组buffer用于读操作,size用于指示传输数据的大小,access是一个原子变量,用于计数实现阻塞其它进程干涉,这里只需要关注 TODO 2/1
- 实现打开和释放函数
1 | // 在结构体定义static const struct file_operations so2_fops中 |
container_of 宏用于从一个结构体成员的地址反推出成员所在的结构体的首地址,用法是container_of(ptr, type, member),在这个例子中container_of 从 inode->i_cdev(一个struct cdev 类型的指针,指向so2_device_data的成员cdev)反推出它所在的 struct so2_device_data 结构体的首地址,从而获得设备的私有数据指针 data
- 显示消息
1 | // 使用pr_info函数,与printf类似 |
- 再次读取
1 | // 使用 cat /dev/so2_cdev |
4 访问限制
使用原子变量限制设备访问
- 在设备结构体中添加
atomic_t变量
1 | // 在结构体so2_device_data中 |
- 在模块初始化时对该变量进行初始化
1 | // 在函数so2_cdev_init中 |
- 在打开函数中使用该变量限制对设备的访问。我们建议使用
atomic_cmpxchg()
1 | // 在函数so2_cdev_open中 |
static inline int atomic_cmpxchg(atomic_t *ptr, int old, int new)
这个函数可以在一个原子操作中检查变量的旧值并将其设为新值,在上面的例子中,它表示如果当前的access等于旧值0就将access设为1,不等于0就不修改,无论是否发生替换,atomic_cmpxchg函数都会返回ptr指向的原始值(也就是操作之前的值)。
- 在释放函数中重置该变量以恢复对设备的访问权限
1 | // 在函数so2_cdev_release中 |
- 模拟休眠
1 | // 在函数so2_cdev_open中 |
set_current_state(TASK_INTERRUPTIBLE);把当前进程(current)的状态设置为可中断睡眠 (TASK_INTERRUPTIBLE)。在这个状态下,进程会被调度器认为是“睡着的”,直到有事件唤醒它schedule_timeout(10 * HZ);把当前进程从 CPU 调度队列里移走,并设置一个定时器,在10 * HZ个 jiffies 后唤醒它。HZ是内核的时钟频率(例如在 x86 上常见是 100、250 或 1000),10 * HZ表示 10 秒。如果在这段时间内进程收到信号,会提前被唤醒。
5 读操作
在驱动程序中实现读取函数
- 在
so2_device_data结构中保持一个缓冲区,并用MESSAGE宏的值进行初始化。缓冲区的初始化在模块的init函数中完成
1 | // struct so2_device_data |
- 在读取调用时,将内核空间缓冲区的内容复制到用户空间缓冲区
使用 copy_to_user() 函数将信息从内核空间复制到用户空间
1 | // static ssize_t so2_cdev_read(file, user_buffer, size, offset) |
需要将请求的字节数size和内部缓冲区大小data->size - *offset作比较,有可能请求的字节数要超过内部缓存区大小,从而引发错误,其实这里应该是判断 size+*offset > data->size,可能为了防止越界写成了减去,注意要更新偏移参数,以便于用户达到文件内部缓冲区末尾时退出
读取函数so2_cdev_read调用返回的值是从内核空间缓冲区传输到用户空间缓冲区的字节数
6 写操作
7 ioctl 操作
8 带消息的 ioctl
9 使用等待队列的 ioctl
10 O_NONBLOCK 实现
四 I/O访问和中断
实验目标:
与外围设备进行通信
实现中断处理程序
将中断与进程上下文同步
关键词:IRQ,I/O 端口,I/O 地址,基地址,UART,request_region,release_region,inb,outb
0 简介
1 | //resource - /inclue/linux/ioport.h |
实现键盘驱动程序
目标是创建一个使用键盘IRQ的驱动程序,检查传入的按键代码并将其存储在缓冲区中。通过字符设备驱动程序,用户空间可以访问该缓冲区。
如果说上一个实验字符设备驱动程序是关于如何驱动外设如何实现物理设备的读写I/O操作,那么这个实验是关于如何通过中断来操控外设
1 请求I/O端口
1 | // 在 kbd_init 函数中 |
请求 I/O 端口后,可以在/proc/ioports中找到自己的端口号
如果遇到报错提示-EBUSY,可能是因为没有执行release_region或者unregister_chrdev_region,需要在init函数开头写release_region或者unregister_chrdev_region然后重新插入模块
2 中断处理例程
所谓中断处理例程,就是中断发生时会执行的代码功能函数,一般是xxx_interrupt_handler()
1 | // 自己写的一个函数 kbd_interrupt_handle 注意类型是 irqreturn_t |
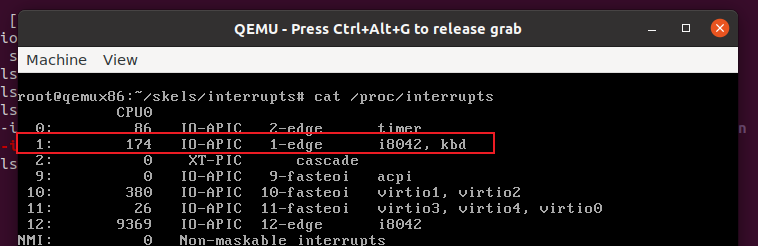
使用request_irq注册中断例程后,能在/proc/interrupts中看到自己的中断程序 kbd
按照“注意”的提示使用
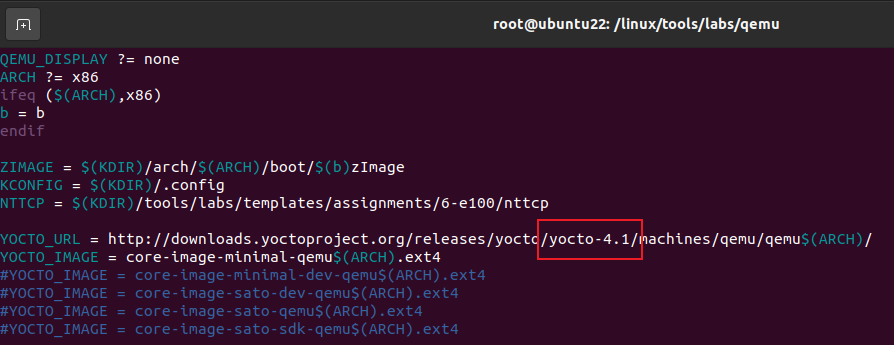
QEMU_DISPLAY=gtk make boot是无法启动成功的,因为QEMU中的Makefile指定需要下载yotco2.4版本的镜像系统,但是链接早就失效了,必须修改QEMU中的Makefile的yotco版本号为4.1才能正常下载系统镜像从而启动,如下图所示修改,如果下载的很慢或者还是下载不了,可能需要使用代理,使用clash-verge的TUN模式可以让虚拟机走代理
没有报错之后应该能正常启动系统,如下所示
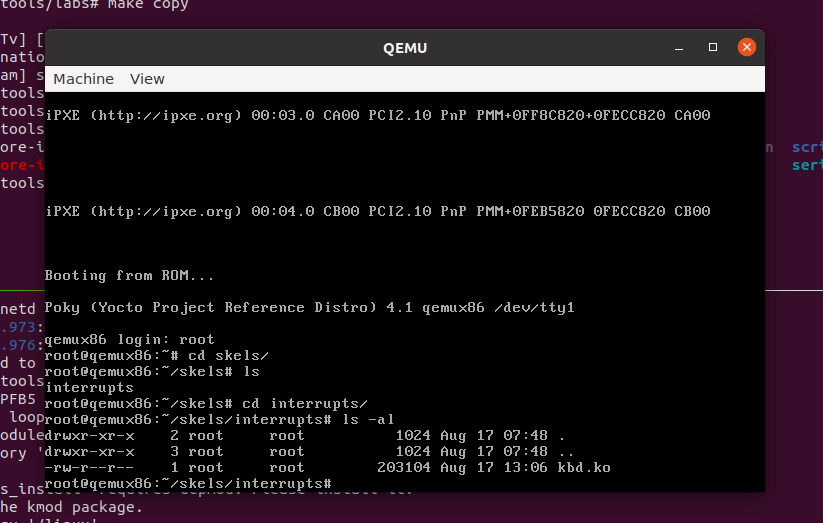
但此时要退出来,因为没有在Docker内执行
make copy,执行前系统内是没有skels这个文件夹的
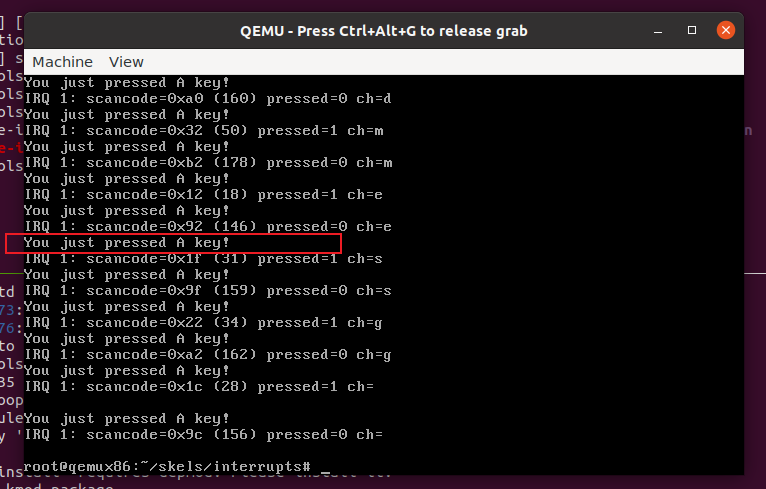
在QEMU中按下键盘按键会触发中断例程程序,使用dmesg可以看到:
3 将 ASCII 键存储到缓冲区
读取数据存储器
1 | // 使用函数 inb 读取 I/O 端口的数据,只读一个字符大小的数据(1 Byte) |
解释扫描码
1 | // 在 kbd_interrupt_handle 函数中 |
将字符存储到缓冲区
1 | // 在 kbd_interrupt_handle 函数中 |
4 读取缓冲区
为了访问键盘记录器的数据,我们需要将其发送到用户空间。我们将使用 /dev/kbd 字符设备来实现这一点。当从该设备读取数据时,我们将从内核空间的缓冲区中获取按键数据
1 | // 使用 get_char() 从缓冲区中读取一个字符,并使用 put_user() 将其存储到用户缓冲区中 |
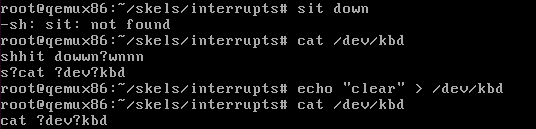
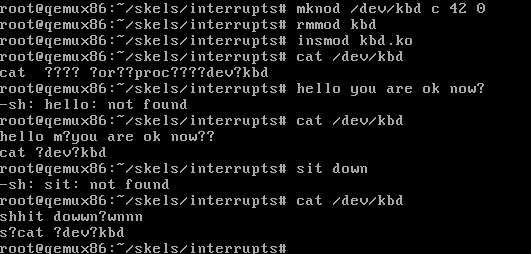
为了测试是否成功实现了从键盘这一物理设备驱动程序的中断中实现数据读取,应该先使用mknod创建/dev/kbd字符设备驱动程序,正如在kbd_init函数中注册字符驱动设备文件的函数 register_chrdev_region 中的参数一样,要使用同样的KBD_MAJOR和MODULE_NAME以及KBD_MINOR,也就是 42、kbd、0,使用命令 mknod /dev/kbd c 42 0 在QEMU中创建设备驱动文件kbd,构建复制和启动QEMU,加载模块后,能在/proc/devices中看到自己的设备文件42 kbd,最后
1 | // 使用 cat /dev/kbd 读取缓冲区中的数据吧,因为 cat 是用户空间使用的命令,因此此时应该显示 |
5 重置缓冲区
使用
echo "clear" > /dev/kbd将数据写入设备
1 | // 实现 reset_buffer |
此时执行命令 echo "clear" > /dev/kbd 会让缓冲区清空